Ross on answering machine, "This is Vikram".

Tuesday 31 January 2012
Monday 30 January 2012
SMS Szent Istvan capsizing.
This is the Austro-Hungarian battleship SMS Szent Istvan capsizing after being hit by Italian torpedo boats.


Resistance 3 Satan Boss Fight
This is one of the bosses in Resistance 3. A giant monster who lives in the underground mine shafts called "Satan" named after the Devil.
Little Nellie
The autogyro used in the 007 movie "You Only live Twice". "Little Nellie".It's designed by Wing Commander Ken Wallis.
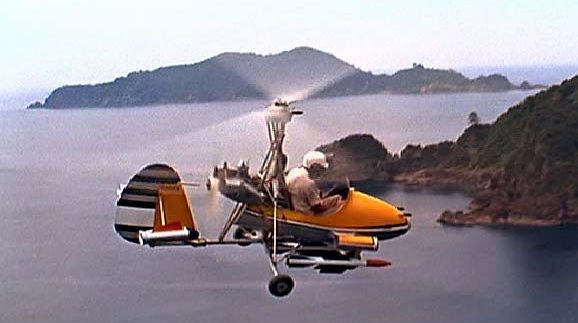 This is Little Nellie in action.
Friday 27 January 2012
Thursday 26 January 2012
HMS Upholder (P37)
The Royal Navy's U-class submarine HMS Upholder
Type, U-class
Weight, Surfaced 630tons, Submerged 730tons
Armament, 1 3-inch deck gun, 6 torpedoes.
Fate, Sunk April 14th 1942

 One of HMS Upholder's victims, The Italian ocean liner SS Conte Rosso.
 The warship that HMS Upholder damaged. The Itailan light cruiser Giuseppe Garibaldi.
 The ship who sank HMS Upholder, The Italian Torpedo boat Pegaso.
Type, U-class
Weight, Surfaced 630tons, Submerged 730tons
Armament, 1 3-inch deck gun, 6 torpedoes.
Fate, Sunk April 14th 1942
The captain of HMS Upholder, Malcolm David Wanklyn, VC, DSO

One of HMS Upholder's victims, The Italian ocean liner SS Conte Rosso.The warship that HMS Upholder damaged. The Itailan light cruiser Giuseppe Garibaldi.The ship who sank HMS Upholder, The Italian Torpedo boat Pegaso.Type VII U-boat
The German WW2 Type VII U-Boat.
Weight, 769 tonnes
Armament, 4 bow torpedo tubes 1 stern torpedo tube, 1 deck gun and 1 AA gun.

Weight, 769 tonnes
Armament, 4 bow torpedo tubes 1 stern torpedo tube, 1 deck gun and 1 AA gun.
Tuesday 24 January 2012
Monday 23 January 2012
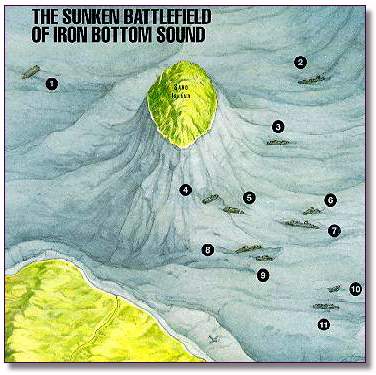
Japanese Battleship Kirishima
One of the fallen at Iron Bottom Sound off Gaudalcanal. The Japanese battleship Kirishima.
Type, Kongo class battlecruiser.
Weight, 36, 600tons
Armament, 8 14inch guns.

The Kirishima was heavily damaged off Savo Island by gunfire from the North Carolina class battleship USS Washington (BB-56) and then scuttled by her own crew.
 The USS Washington (BB-56).
This is the wreck of the Kirishima.

Type, Kongo class battlecruiser.
Weight, 36, 600tons
Armament, 8 14inch guns.
The Kirishima was heavily damaged off Savo Island by gunfire from the North Carolina class battleship USS Washington (BB-56) and then scuttled by her own crew.
The USS Washington (BB-56).This is the wreck of the Kirishima.
Thursday 19 January 2012
M-18 Hellcat Tank Destroyer
The M-18 Hellcat tank destroyer.
Armour, 25mm thick
Armament, 1 76mm gun and 1 50cal machine gun.

Weight, 17.7 tonnes
Armament, 1 76mm gun and 1 50cal machine gun.
The Russian T-34 tank
The famous Russian T-34 tank
Crew, 4
Weight, 26.5 tonnes
The T-34 has Sloped armour.
Armament, 76mm gun, later versions 85mm gun and 2 machine guns.
 This is the T-34/76
 The T34/85 at the Imperial War Museum.
Crew, 4
Weight, 26.5 tonnes
The T-34 has Sloped armour.
Armament, 76mm gun, later versions 85mm gun and 2 machine guns.
This is the T-34/76The T34/85 at the Imperial War Museum.
Only Fools and Horses, Chandier
The famous chandlier gag from Only Fools and Horses.
"Brace yourself Rodney, Brace yourself". Del Boy.
Tuesday 17 January 2012
Jagdtiger, tank destroyer
This is the massive Jagdtiger (Hunting Tiger) tank destroyer
Weight, 71.7 tonnes
Armour, 250mm thick
Crew, 6

Weight, 71.7 tonnes
Armour, 250mm thick
Crew, 6
Armament, 128mm main gun and 1 MG42 machine gun.
Matilda II Tank
The Matilda II infantry tank
Weight, 25 tons
Crew, 4
Armour, 20mm thick
Armament, 2 pounder gun, 1 Besa machine gun and 2 smoke throwers
 This Matilda II (Golden Miller) at the Tank Museum in Bovington, Dorset.
Weight, 25 tons
Crew, 4
Armour, 20mm thick
Armament, 2 pounder gun, 1 Besa machine gun and 2 smoke throwers
This Matilda II (Golden Miller) at the Tank Museum in Bovington, Dorset.
Monday 16 January 2012
Saturday 14 January 2012
Kangaroo Jack
This is the camel scene from Kangaroo Jack
"These are noble beasts my friend. Proud, Majestic" (Camels pass wind).
Thursday 12 January 2012


A Bridge too Far
This is where the Germans tryed to blow up Nijmegen bridge but the explosives failed to detonate allowing the Sherman tanks of 30th corps to cross the bridge.

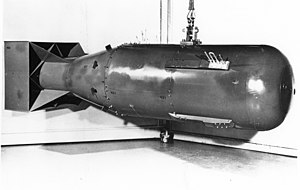
The first atomic bombs
On August 6th 1945, The B-29 Superfortress named "Enola Gay" dropped the first atomic bomb "Little Boy" on the Japanese city of Hiroshima.
 The B-29 "Bocks Car"This is "Fat Man"
 This is the mushroom atomic
This is the B-29 which dropped "Little Boy", "Enola Gay"
This is "Little Boy".
On August 9th 1945 a second atomic bomb "Fat Man" was dropped by the B-29 bomber named "Bocks Car."on the city of Nagasaki.
The B-29 "Bocks Car"This is "Fat Man"This is the mushroom atomic cloud above Nagasaki.
Hanon Hosho (Marina). My No1 mermaid girlfriend.
This is my No1 mermaid girlfriend, Hanon Hosho (Marina)


Transformers 3, Dark of the Moon soundtrack
Transformers 3, Dark of the Moon soundtrack, It's our fight
MOHU soundtrack, Panzer Blockade
This is a piece of the soundtrack from Medal of Honor Underground, Panzer Blockade.

This tank is the giant Tiger IIb(King Tiger) tank
Weight, 74,000 tons
Armament, 1 88mm gun and two MG-42 machine guns
My mermaid girlfriend Luchia Namami (Syrena) in a bath.
This is one of my mermaid girlfriend Luchia Namami (Syrena) singing in the bath.


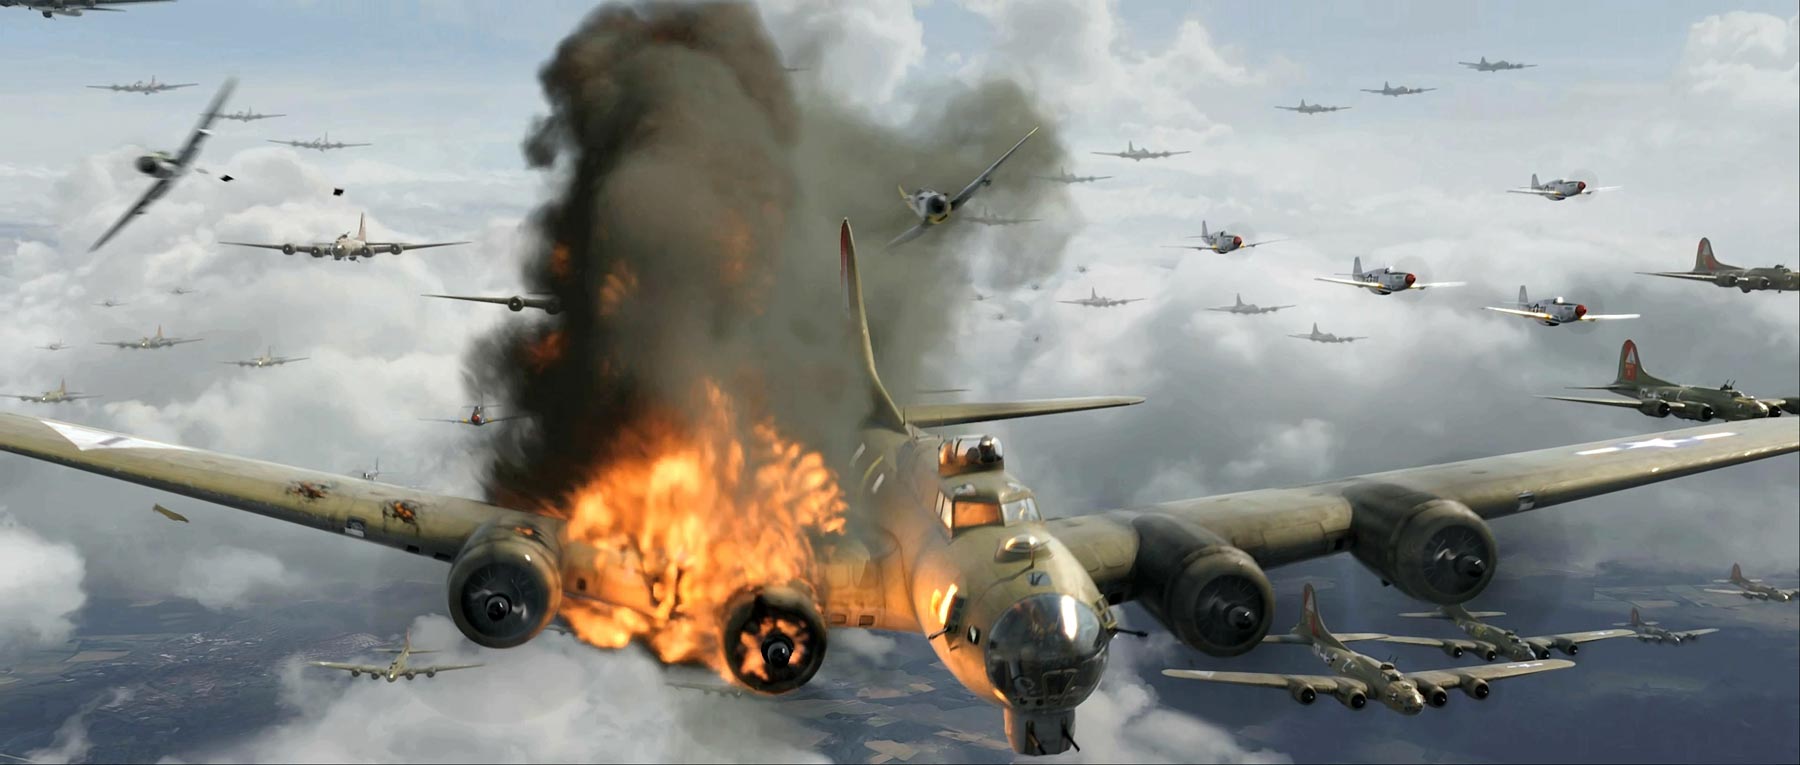
Battle of Midway movie
These are some footage from the Battle of Midway movie.
 "Scratch one flat-top!".
Wednesday 11 January 2012
Tuesday 10 January 2012
The Battle of Midway 4/6/1942
The Battle of Midway is widely regarded as the most important naval battle of the Pacific Campaign of World War II.[5][6][7] Between 4 and 7 June 1942, only six months after Japan's attack on Pearl Harbor, and one month after the Battle of the Coral Sea, the United States Navy decisively defeated an Imperial Japanese Navy (IJN) attack against Midway Atoll, inflicting irreparable damage on the Japanese fleet.[8] Military historian John Keegan has called it "the most stunning and decisive blow in the history of naval warfare."[9]
The Japanese operation, like the earlier attack on Pearl Harbor, sought to eliminate the United States as a strategic power in the Pacific, thereby giving Japan a free hand in establishing its Greater East Asia Co-Prosperity Sphere. The Japanese hoped that another demoralizing defeat would force the U.S. to capitulate in the Pacific War.[10]
The Japanese plan was to lure the United States' aircraft carriers into a trap.[11] The Japanese also intended to occupy Midway Atoll as part of an overall plan to extend their defensive perimeter in response to the Doolittle Raid. This operation was also considered preparatory for further attacks against Fiji and Samoa.
The plan was handicapped by faulty Japanese assumptions of the American reaction and poor initial dispositions.[12] Most significantly, American codebreakers were able to determine the date and location of the attack, enabling the forewarned U.S. Navy to set up an ambush of its own. Four Japanese aircraft carriers and a heavy cruiser were sunk for a cost of one American aircraft carrier and a destroyer. After Midway, and the exhausting attrition of the Solomon Islands campaign, Japan's shipbuilding and pilot training programs were unable to keep pace in replacing their losses while the U.S. steadily increased its output in both areas.[13]
Strategic context
Japan had attained its initial strategic goals quickly, taking the Philippines, Malaya, Singapore, and the Dutch East Indies (now Indonesia); the latter, with its vital resources, was particularly important to Japan. Because of this, preliminary planning for a second phase of operations commenced as early as January 1942. However, there were strategic disagreements between the Imperial Army and Imperial Navy, and infighting between the Navy's GHQ and Admiral Isoroku Yamamoto's Combined Fleet, such that a follow-up strategy was not formulated until April 1942.[14] Admiral Yamamoto finally succeeded in winning the bureaucratic struggle by using a thinly veiled threat to resign, after which his operational concept of further operations in the Central Pacific was accepted ahead of other competing plans.[15]
Yamamoto's primary strategic goal was the elimination of America's carrier forces, which he perceived as the principal threat to the overall Pacific campaign.[nb 1] This concern was acutely heightened by the Doolittle Raid (18 April 1942) in which USAAF B-25 Mitchells launched from USS Hornet bombed targets in Tokyo and several other Japanese cities. The raid, while militarily insignificant, was a severe psychological shock to the Japanese and showed the existence of a gap in the defenses around the Japanese home islands.[16][nb 2] This and other successful "hit and run" raids by American carriers, showed that they were still a threat although, seemingly, reluctant to be drawn into an all-out battle.[17] Yamamoto reasoned that another attack on the main U.S base at Pearl Harbor would induce all of the American fleet out to fight, including the carriers; however, given the strength of American land-based air power on Hawaii, he judged that Pearl Harbor could no longer be attacked directly.[18] Instead, he selected Midway, at the extreme northwest end of the Hawaiian Island chain, some 1,300 mi (1,100 nmi; 2,100 km) from Oahu. Midway was not especially important in the larger scheme of Japan's intentions, but the Japanese felt the Americans would consider Midway a vital outpost of Pearl Harbor and would therefore strongly defend it.[19] The U.S. did consider Midway vital; after the battle, establishment of a U.S. submarine base on Midway allowed submarines operating from Pearl Harbor to refuel and reprovision, extending their radius of operations by 1,200 mi (1,900 km). An airstrip on Midway served as a forward staging point for bomber attacks on Wake Island.[20]
Yamamoto's plan, Operation Mai
Typical of Japanese naval planning during World War II, Yamamoto's battle plan was exceedingly complex.[21] Additionally, his design was predicated on optimistic intelligence suggesting USS Enterprise and USS Hornet, forming Task Force 16, were the only carriers available to the U.S. Pacific Fleet at the time. At the Battle of the Coral Sea just a month earlier, USS Lexington had been sunk and USS Yorktown damaged severely enough that the Japanese believed it also to have been sunk. The Japanese were also aware that USS Saratoga was undergoing repairs on the West Coast after suffering torpedo damage from a submarine.
However, more important was Yamamoto's belief the Americans had been demoralized by their frequent defeats during the preceding six months. Yamamoto felt deception would be required to lure the U.S. fleet into a fatally compromised situation.[22] To this end, he dispersed his forces so that their full extent (particularly his battleships) would be unlikely to be discovered by the Americans prior to battle. Critically, Yamamoto's supporting battleships and cruisers would trail Vice-Admiral Nagumo Chūichi's carrier striking force by several hundred miles. Japan's heavy surface forces were intended to destroy whatever part of the U.S. fleet might come to Midway's relief, once Nagumo's carriers had weakened them sufficiently for a daylight gun duel;[23] this was typical of the battle doctrine of most major navies.[24]
Yamamoto did not know that the U.S. had broken the main Japanese naval code (dubbed JN-25 by the Americans). Yamamoto's emphasis on dispersal also meant that none of his formations could support each other. For instance, the only significant warships larger than destroyers that screened Nagumo's fleet were two battleships and three cruisers, despite his carriers being expected to carry out the strikes and bear the brunt of American counterattacks. By contrast, the flotillas of Yamamoto and Kondo had between them two light carriers, five battleships, and six cruisers, none of which would see any action at Midway.[23] Their distance from Nagumo's carriers would also have grave implications during the battle, because the larger warships in Yamamoto and Kondo's forces carried scout planes, an invaluable reconnaissance capability denied to Nagumo.
Prelude to battle
Allied code-breaking,
Admiral Nimitz had one priceless asset: cryptanalysts had broken the JN-25 code.[44] Since the early spring of 1942, the US had been decoding messages stating that there would soon be an operation at objective "AF." Commander Joseph J. Rochefort and his team at Station Hypo were able to confirm Midway as the target of the impending Japanese strike by having the base at Midway send a false message stating that its water distillation plant had been damaged and that the base needed fresh water. The Japanese saw this and soon started to send messages stating that "AF was short on water."[45] Hypo was also able to determine the date of the attack as either 4 or 5 June, and to provide Nimitz with a complete IJN order of battle.[46] Japan's efforts to introduce a new codebook had been delayed, giving HYPO several crucial days; while it was blacked out shortly before the attack began, the important breaks had already been made.[47][nb 4]
As a result, the Americans entered the battle with a very good picture of where, when, and in what strength the Japanese would appear. Nimitz was aware, for example, that the vast Japanese numerical superiority had been divided into no less than four task forces. This dispersal resulted in few fast ships being available to escort the Carrier Striking Force, limiting the anti-aircraft guns protecting the carriers. Nimitz thus calculated that his three carrier decks, plus Midway Island, to Yamamoto's four, gave the U.S. rough parity, especially since American carrier air groups were larger than Japanese ones. The Japanese, by contrast, remained almost totally unaware of their opponent's true strength and dispositions even after the battle began.[26]
Initial air attacks,
To do battle with an enemy force anticipated to muster four or five carriers, Admiral Chester W. Nimitz, Commander in Chief, Pacific Ocean Areas, needed every available U.S. flight deck. He already had Vice Admiral William Halsey's two-carrier (Enterprise and Hornet) task force at hand, though Halsey was stricken with psoriasis and had to be replaced by Rear Admiral Raymond A. Spruance, Halsey's escort commander.[28] Nimitz also hurriedly recalled Rear Admiral Frank Jack Fletcher's task force, including the carrier Yorktown (which had suffered considerable damage at Coral Sea), from the South West Pacific Area. It reached Pearl Harbor just in time to provision and sail.
Meanwhile, as a result of her participation in the Battle of the Coral Sea, the Japanese carrier Zuikaku was in port in Kure, awaiting a replacement air group. That there were none immediately available was a failure of the IJN crew training program, which already showed signs of being unable to replace losses.[36] Instructors from the Yokosuka Air Corps were employed in an effort to make up the shortfall.[36] The heavily damaged Shōkaku had suffered three bomb hits at Coral Sea, and required months of repair in drydock. Despite the likely availability of sufficient aircraft between the two ships to re-equip Zuikaku with a composite air group, the Japanese made no serious attempt to get her into the forthcoming battle.[37] Consequently, Admiral Nagumo would only have four fleet carriers: Kaga and Akagi forming Carrier Division 1; Hiryū and Sōryū as Carrier Division 2. At least part of this was a product of fatigue; Japanese carriers had been constantly on operations since 7 December 1941, including raids on Darwin and Colombo.
The main Japanese strike aircraft to be used were the Aichi D3A dive bomber and the Nakajima B5N2, which was capable of being used either as a torpedo bomber or as a level attack bomber. The main carrier fighter was the fast and highly maneuverable Mitsubishi A6M2 "Zero".[nb 3] However, the carriers of the Kido Butai were suffering from a shortage of frontline aircraft. For various reasons, production of the D3A had been drastically reduced, while that of the B5N had been stopped completely.[38] As a consequence, there were none available to replace losses. This also meant that many of the aircraft being used during the June 1942 operations had been operational since late November 1941; although well maintained, they were almost worn out and had become increasingly unreliable. These factors meant that all carriers had fewer than their normal aircraft complement and few spare aircraft.[39]
Japanese strategic scouting arrangements prior to the battle were also in disarray. A picket line of Japanese submarines was late getting into position (partly because of Yamamoto's haste), which let the American carriers reach their assembly point northeast of Midway (known as "Point Luck") without being detected.[40] A second attempt at reconnaissance, using four-engine Kawanishi H8K flying boats to scout Pearl Harbor prior to the battle (and thereby detect the absence or presence of the American carriers), part of Operation K, was also thwarted when Japanese submarines assigned to refuel the search aircraft discovered that the intended refueling point — a hitherto deserted bay off French Frigate Shoals — was occupied by American warships (because the Japanese had carried out an identical mission in March).[41] Thus, Japan was deprived of any knowledge concerning the movements of the American carriers immediately before the battle.
Japanese radio intercepts did notice an increase in both American submarine activity and message traffic. This information was in Yamamoto's hands prior to the battle. However, Japanese plans were not changed; Yamamoto, at sea on Yamato, did not dare inform Nagumo for fear of exposing his position and assumed that Nagumo had received the same signal from Tokyo.[42] Nagumo's radio antennae, however, were unable to receive such long-wave transmissions, and he was left unaware of any American ship movements
The Japanese operation, like the earlier attack on Pearl Harbor, sought to eliminate the United States as a strategic power in the Pacific, thereby giving Japan a free hand in establishing its Greater East Asia Co-Prosperity Sphere. The Japanese hoped that another demoralizing defeat would force the U.S. to capitulate in the Pacific War.[10]
The Japanese plan was to lure the United States' aircraft carriers into a trap.[11] The Japanese also intended to occupy Midway Atoll as part of an overall plan to extend their defensive perimeter in response to the Doolittle Raid. This operation was also considered preparatory for further attacks against Fiji and Samoa.
The plan was handicapped by faulty Japanese assumptions of the American reaction and poor initial dispositions.[12] Most significantly, American codebreakers were able to determine the date and location of the attack, enabling the forewarned U.S. Navy to set up an ambush of its own. Four Japanese aircraft carriers and a heavy cruiser were sunk for a cost of one American aircraft carrier and a destroyer. After Midway, and the exhausting attrition of the Solomon Islands campaign, Japan's shipbuilding and pilot training programs were unable to keep pace in replacing their losses while the U.S. steadily increased its output in both areas.[13]
Strategic context
Japan had attained its initial strategic goals quickly, taking the Philippines, Malaya, Singapore, and the Dutch East Indies (now Indonesia); the latter, with its vital resources, was particularly important to Japan. Because of this, preliminary planning for a second phase of operations commenced as early as January 1942. However, there were strategic disagreements between the Imperial Army and Imperial Navy, and infighting between the Navy's GHQ and Admiral Isoroku Yamamoto's Combined Fleet, such that a follow-up strategy was not formulated until April 1942.[14] Admiral Yamamoto finally succeeded in winning the bureaucratic struggle by using a thinly veiled threat to resign, after which his operational concept of further operations in the Central Pacific was accepted ahead of other competing plans.[15]
Yamamoto's primary strategic goal was the elimination of America's carrier forces, which he perceived as the principal threat to the overall Pacific campaign.[nb 1] This concern was acutely heightened by the Doolittle Raid (18 April 1942) in which USAAF B-25 Mitchells launched from USS Hornet bombed targets in Tokyo and several other Japanese cities. The raid, while militarily insignificant, was a severe psychological shock to the Japanese and showed the existence of a gap in the defenses around the Japanese home islands.[16][nb 2] This and other successful "hit and run" raids by American carriers, showed that they were still a threat although, seemingly, reluctant to be drawn into an all-out battle.[17] Yamamoto reasoned that another attack on the main U.S base at Pearl Harbor would induce all of the American fleet out to fight, including the carriers; however, given the strength of American land-based air power on Hawaii, he judged that Pearl Harbor could no longer be attacked directly.[18] Instead, he selected Midway, at the extreme northwest end of the Hawaiian Island chain, some 1,300 mi (1,100 nmi; 2,100 km) from Oahu. Midway was not especially important in the larger scheme of Japan's intentions, but the Japanese felt the Americans would consider Midway a vital outpost of Pearl Harbor and would therefore strongly defend it.[19] The U.S. did consider Midway vital; after the battle, establishment of a U.S. submarine base on Midway allowed submarines operating from Pearl Harbor to refuel and reprovision, extending their radius of operations by 1,200 mi (1,900 km). An airstrip on Midway served as a forward staging point for bomber attacks on Wake Island.[20]
Yamamoto's plan, Operation Mai
Typical of Japanese naval planning during World War II, Yamamoto's battle plan was exceedingly complex.[21] Additionally, his design was predicated on optimistic intelligence suggesting USS Enterprise and USS Hornet, forming Task Force 16, were the only carriers available to the U.S. Pacific Fleet at the time. At the Battle of the Coral Sea just a month earlier, USS Lexington had been sunk and USS Yorktown damaged severely enough that the Japanese believed it also to have been sunk. The Japanese were also aware that USS Saratoga was undergoing repairs on the West Coast after suffering torpedo damage from a submarine.
However, more important was Yamamoto's belief the Americans had been demoralized by their frequent defeats during the preceding six months. Yamamoto felt deception would be required to lure the U.S. fleet into a fatally compromised situation.[22] To this end, he dispersed his forces so that their full extent (particularly his battleships) would be unlikely to be discovered by the Americans prior to battle. Critically, Yamamoto's supporting battleships and cruisers would trail Vice-Admiral Nagumo Chūichi's carrier striking force by several hundred miles. Japan's heavy surface forces were intended to destroy whatever part of the U.S. fleet might come to Midway's relief, once Nagumo's carriers had weakened them sufficiently for a daylight gun duel;[23] this was typical of the battle doctrine of most major navies.[24]
Yamamoto did not know that the U.S. had broken the main Japanese naval code (dubbed JN-25 by the Americans). Yamamoto's emphasis on dispersal also meant that none of his formations could support each other. For instance, the only significant warships larger than destroyers that screened Nagumo's fleet were two battleships and three cruisers, despite his carriers being expected to carry out the strikes and bear the brunt of American counterattacks. By contrast, the flotillas of Yamamoto and Kondo had between them two light carriers, five battleships, and six cruisers, none of which would see any action at Midway.[23] Their distance from Nagumo's carriers would also have grave implications during the battle, because the larger warships in Yamamoto and Kondo's forces carried scout planes, an invaluable reconnaissance capability denied to Nagumo.
Prelude to battle
Allied code-breaking,
Admiral Nimitz had one priceless asset: cryptanalysts had broken the JN-25 code.[44] Since the early spring of 1942, the US had been decoding messages stating that there would soon be an operation at objective "AF." Commander Joseph J. Rochefort and his team at Station Hypo were able to confirm Midway as the target of the impending Japanese strike by having the base at Midway send a false message stating that its water distillation plant had been damaged and that the base needed fresh water. The Japanese saw this and soon started to send messages stating that "AF was short on water."[45] Hypo was also able to determine the date of the attack as either 4 or 5 June, and to provide Nimitz with a complete IJN order of battle.[46] Japan's efforts to introduce a new codebook had been delayed, giving HYPO several crucial days; while it was blacked out shortly before the attack began, the important breaks had already been made.[47][nb 4]
As a result, the Americans entered the battle with a very good picture of where, when, and in what strength the Japanese would appear. Nimitz was aware, for example, that the vast Japanese numerical superiority had been divided into no less than four task forces. This dispersal resulted in few fast ships being available to escort the Carrier Striking Force, limiting the anti-aircraft guns protecting the carriers. Nimitz thus calculated that his three carrier decks, plus Midway Island, to Yamamoto's four, gave the U.S. rough parity, especially since American carrier air groups were larger than Japanese ones. The Japanese, by contrast, remained almost totally unaware of their opponent's true strength and dispositions even after the battle began.[26]
Initial air attacks,
The first air attack took off at 12:30 on 3 June, consisting of nine B-17s operating from Midway. Three hours later, they found the Japanese transport group 570 nmi (660 mi; 1,060 km) to the west.[48] Under heavy anti-aircraft fire, they dropped their bombs. Though hits were reported,[48] none of the bombs actually landed on target and no significant damage was inflicted.[49] Early the following morning, Japanese oil tanker Akebono Maru sustained the first hit when a torpedo from an attacking PBY flying boat struck her around 01:00. This would be the only successful air launched torpedo attack by the U.S. during the entire battle.[49]
At 04:30 on 4 June, Nagumo launched his initial attack on Midway itself, consisting of 36 Vals and 36 Kates, escorted by 36 Zeros. At the same time, he launched combat air patrol (CAP), as well as his eight search aircraft (one from the heavy cruiser Tone launched 30 minutes late due to technical difficulties).
Japanese reconnaissance arrangements were flimsy, with too few aircraft to adequately cover the assigned search areas, laboring under poor weather conditions to the northeast and east of the task force.[50] Yamamoto's faulty dispositions had now become a serious liability.[51]
American radar picked up the enemy at a distance of several miles and interceptors were soon scrambled. Unescorted bombers headed off to attack the Japanese carrier fleet, their fighter escorts remaining behind to defend Midway. At 06:20, Japanese carrier aircraft bombed and heavily damaged the U.S. base. Midway-based Marine fighter pilots, flying F4F-3 Wildcats and obsolete Brewster F2A-3 Buffalos,[52] intercepted the Japanese and suffered heavy losses, though they managed to destroy four D3As and at least three A6Ms. Most of the U.S. planes were downed in the first few minutes; several were damaged, and only two remained flyable. In all, three F4Fs and 13 F2As were shot down. American anti-aircraft fire was accurate and intense, damaging many Japanese aircraft and claiming one-third of the Japanese planes destroyed.[53]
The initial Japanese attack did not succeed in neutralizing Midway. American bombers could still use the airbase to refuel and attack the Japanese invasion force; another aerial attack would be necessary if troops were to go ashore by 7 June.[54]
Having taken off prior to the Japanese attack, American bombers based on Midway made several attacks on the Japanese carrier fleet. These included six TBFs from Hornet's VT-8, their crews on their first combat operation, and four USAAF B-26 Marauders armed with torpedoes. The first Marine aviator to perish during the battle, Major Lofton Henderson of VMSB-241, was killed while leading his inexperienced squadron of SBDs into action against the Japanese carriers and was later honored by having the main airfield at Guadalcanal named after him in August 1942.[55] The Japanese shrugged off these attacks with almost no losses (two fighters lost), while destroying all but one TBF and two B-26s. One B-26, hit by anti-aircraft fire from Akagi, made no attempt to pull out of its run and narrowly missed crashing directly into the carrier's bridge. This experience may well have contributed to Nagumo's determination to launch another attack on Midway, in direct violation of Yamamoto's order to keep the reserve strike force armed for anti-ship operations.[
Nagumo's decision
Admiral Nagumo, in accordance with Japanese carrier doctrine at the time, had kept half of his aircraft in reserve. These comprised two squadrons each of dive bombers and torpedo bombers, the latter armed with torpedoes, should any American warships be located. The dive bombers were, as yet, unarmed.[58] As a result of the attacks from Midway, as well as the morning flight leader's recommendation of a second strike, at 07:15, Nagumo ordered his reserve planes to be re-armed with contact-fused general purpose bombs for use against land targets. Some sources maintain that this had been underway for about 30 minutes when, at 07:40[59] the delayed scout plane from Tone signaled that it had sighted a sizable American naval force to the east, although it neglected to describe the composition of this force. New evidence, however, suggests Nagumo did not receive the sighting report until 08:00, so the rearming operation actually proceeded for 45 minutes.[60] Nagumo quickly reversed his order and demanded that the scout plane ascertain the composition of the American force, but another 40 minutes elapsed before Tones scout finally radioed the presence of a single carrier in the American force: this was one of the carriers from TF 16, the other carrier was not sighted.[61]
Nagumo was now in a quandary. Rear Admiral Tamon Yamaguchi, leading Carrier Division 2 (Hiryū and Sōryū), recommended Nagumo strike immediately with the forces at hand: 18 Aichi D3A2 dive bombers each on Sōryū and Hiryū, and half the ready cover patrol aircraft.[62] Nagumo's seeming opportunity to hit the American ships,[63] however, was now limited by the fact that his Midway strike force would be returning shortly and needing to land promptly or ditch (as is commonly believed).[64] Because of the constant flight deck activity associated with combat air patrol operations during the preceding hour, the Japanese never had an opportunity to "spot" (position) their reserve for launch. The few aircraft on the Japanese flight decks at the time of the attack were either defensive fighters, or (in the case of Sōryū) fighters being spotted to augment the task force defenses.[65] Spotting his flight decks and launching aircraft would have required at least 30–45 minutes.[66] Furthermore, by spotting and launching immediately, Nagumo would be committing some of his reserve to battle without proper anti-ship armament; he had just witnessed how easily unescorted American bombers had been shot down.[67] (In the event, poor discipline saw many of the Japanese bombers ditch their bombs and attempt to dogfight intercepting F4Fs.)[68] Japanese carrier doctrine preferred fully constituted strikes, and without confirmation (until 08:20) of whether the American force included carriers, Nagumo's reaction was doctrinaire.[69] In addition, the arrival of another American air strike at 07:53 gave weight to the need to attack the island again. In the end, Nagumo chose to wait for his first strike force to land, then launch the reserve, which would by then be properly armed and ready.[70]
In the final analysis, it made no difference; Fletcher's carriers had launched beginning at 07:00, so the aircraft which would deliver the crushing blow were already on their way. There was nothing Nagumo could do about it. This was the fatal flaw of Yamamoto's dispositions: they followed strictly traditional battleship doctrine.[71]
Attacks on the Japanese fleet,
The Americans had already launched their carrier aircraft against the Japanese. Admiral Fletcher, in overall command aboard Yorktown, and benefiting from PBY patrol bomber sighting reports from the early morning, ordered Spruance to launch against the Japanese as soon as was practical, while initially holding Yorktown in reserve should there be any other Japanese carriers discovered.[72] (Fletcher's directions to Spruance were relayed via Nimitz who, unlike Yamamoto, had remained ashore.)
Spruance judged that though the range was extreme a strike could succeed and gave the order "Launch the attack" at around 06:00. He then left Halsey's Chief of Staff, Captain Miles Browning, to work out the details and oversee the launch, which did not go smoothly. It took until a few minutes after 07:00 before the first plane was able to depart from Spruance's carriers, Enterprise and Hornet. Fletcher, upon completing his own scouting flights, followed suit at 08:00 from Yorktown.[73]
Fletcher, Yorktown's commanding officer Captain Elliott Buckmaster, and their staffs had acquired first-hand experience in organizing and launching a full strike against an enemy force at Coral Sea, but there was no time to pass these lessons to Enterprise and Hornet which were tasked with launching the first strike.[74] Spruance gave at this point his second crucial command, "Proceed to target" -- not to cast away precious minutes, waiting for the strike force to assemble fully, but to proceed to the target as quickly as possible, since neutralizing enemy carriers was the key to the survival of his own task force. Spruance judged that the need to throw something at the enemy as soon as feasible was greater than the need for a coordinated attack among the different types of aircraft (fighters, bombers, torpedo planes). Accordingly, American squadrons were launched piecemeal and proceeded to the target in several different groups. The lack of coordination was expected to diminish the overall impact of the American attacks as well as increasing their casualties. However, Spruance calculated that this risk was worth it, since keeping the Japanese under aerial attack hampered their ability to launch a counterstrike (Japanese doctrine preferred fully constituted attacks), and he gambled that he could find Nagumo with his decks at their most vulnerable.[73][74]
American carrier aircraft had difficulty locating the target, despite the positions they had been given. The strike from Hornet, led by Commander Stanhope C. Ring, followed an incorrect heading of 263 degrees rather than the 240 heading indicated by the contact report. As a result, Air Group Eight's dive bombers missed the Japanese carriers.[75] Torpedo Squadron 8 (VT-8, from Hornet), led by Lieutenant Commander John C. Waldron broke formation from Ring and followed the correct heading. Waldron's squadron sighted the enemy carriers and began attacking at 09:20, followed by Torpedo Squadron 6 (VT-6, from Enterprise) at 09:40.[76] Without fighter escort, all fifteen TBD Devastators of VT-8 were shot down without being able to inflict any damage, with Ensign George H. Gay, Jr. the only survivor. VT-6 met nearly the same fate, with no hits to show for its effort, thanks in part to the abysmal performance of their Mark 13 aircraft torpedoes;[77] senior Navy and BuOrd officers never questioned why half a dozen torpedoes, released so close to the Japanese carriers, produced no results.[78] The Japanese combat air patrol, flying the much faster Mitsubishi A6M2 "Zeros", made short work of the unescorted, slow, under-armed TBDs. A few TBDs managed to get within a few ship-lengths range of their targets before dropping their torpedoes, being close enough to be able to strafe the enemy ships and force the Japanese carriers to make sharp evasive maneuvers.[79]
Despite their losses, the American torpedo attacks indirectly achieved three important results. First, they kept the Japanese carriers off balance, with no ability to prepare and launch their own counterstrike. Second, their attacks pulled the Japanese combat air patrol out of position. Third, many of the Zeros ran low on ammunition and fuel.[80] The appearance of a third torpedo plane attack from the southeast by Torpedo Squadron 3 (VT-3) at 10:00 very quickly drew the majority of the Japanese CAP to the southeast quadrant of the fleet.[81] Better discipline, and employment of all the Zeroes aboard, might have enabled Nagumo to succeed.[82]
By chance, at the same time VT-3 was sighted by the Japanese, three squadrons of American SBDs from Enterprise and Yorktown, VB-6, VS-6 and VB-3 respectively, were approaching the Japanese fleet from the northeast and southwest. They were running low on fuel because of the time spent looking for the enemy. However, squadron commander C. Wade McClusky, Jr. decided to continue the search and by good fortune saw the wake of the Japanese destroyer Arashi. The destroyer was steaming at full speed to rejoin Nagumo's carrier force after having unsuccessfully depth-charged the U.S. submarine Nautilus, which had earlier unsuccessfully attacked the battleship Kirishima.[83] Some bombers were lost from fuel exhaustion before the attack commenced.[84]
McClusky's decision to continue the search was credited by Admiral Chester Nimitz, and his judgment "decided the fate of our carrier task force and our forces at Midway...."[85] The American dive-bombers arrived at the perfect time to attack.[86] Armed Japanese strike aircraft filled the hangar decks, fuel hoses snaked across the decks as refueling operations were hastily completed, and the repeated change of ordnance meant bombs and torpedoes were stacked around the hangars, rather than stowed safely in the magazines,[87] making the Japanese carriers extraordinarily vulnerable.
Enterprise's VB-6 and VS-6 air group split up and attacked two targets. Beginning at 10:22, McClusky and his wingmen scored hits on Kaga, while to the north Akagi was attacked four minutes later by three bombers,[79] led by Lieutenant Commander Richard Halsey Best. Yorktown's VB-3 commanded by Max Leslie went for Sōryū scoring hits. Simultaneously, VT-3 targeted Hiryū, which was sandwiched between Sōryū, Kaga, and Akagi, but scored no hits. The dive-bombers, within six minutes, left Sōryū and Kaga ablaze. Akagi was hit by just one bomb (dropped by LCDR Best), which penetrated to the upper hangar deck and exploded among the armed and fueled aircraft there. One bomb exploded underwater very close astern, the resulting geyser bending the flight deck upward and also causing crucial rudder damage.[nb 5] Sōryū took three bombs in her hangar deck; Kaga, at least four, possibly five. All three carriers were out of action and were eventually abandoned and scuttled.[88]
Japanese counterattacks,
Hiryū, the sole surviving Japanese aircraft carrier, wasted little time in counterattacking. The first wave of Japanese dive bombers badly damaged Yorktown with three bomb hits that snuffed out her boilers, immobilizing her: however, in about an hour her damage control teams patched her up so effectively that the second wave's torpedo bombers mistook her for an undamaged carrier.[90] Despite Japanese hopes to even the odds by eliminating two carriers with two strikes, Yorktown absorbed both Japanese attacks, the second wave mistakenly believing Yorktown had already been sunk and that they were attacking Enterprise. After two torpedo hits, Yorktown lost power and developed a 26° list to port, which put her out of action and forced Admiral Fletcher to move his command staff to the heavy cruiser Astoria. Both carriers of Spruance's Task Force 16 were undamaged.[91]
News of the two strikes, with the reports that each had sunk an American carrier, greatly improved morale in the Kido Butai. Its few surviving aircraft were all recovered aboard Hiryū, where they were prepared for a strike against what was believed to be the only remaining American carrier.[92]
American counterattack
Late in the afternoon, a Yorktown scout aircraft located Hiryū, prompting Enterprise to launch a final strike of dive bombers (including 10 SBDs from Yorktown). Despite Hiryū being defended by a strong cover of more than a dozen Zero fighters, the attack by ' 'Enterprise' ' was successful: four, possibly five bombs hit Hiryū, leaving the carrier ablaze and unable to operate aircraft. (Hornet's strike, launched late because of a communications error, concentrated on the remaining escort ships, but failed to score any hits.) After futile attempts at controlling the blaze, most of the remaining crew on Hiryū were evacuated and the remainder of the fleet continued sailing north-east in an attempt to intercept the American carriers. Hiryū stayed afloat for several more hours, being discovered early the next morning by an aircraft from the carrier Hōshō, prompting hopes that the Hiryu could be saved and perhaps even be towed back to Japan. However, soon after being spotted Hiryū sank. Rear Admiral Yamaguchi chose to go down with his ship, costing Japan perhaps her best carrier commander. [93]
As darkness fell, both sides took stock and made tentative plans for continuing the action. Admiral Fletcher, obliged to abandon derelict Yorktown and feeling he could not adequately command from a cruiser, ceded operational command to Spruance. Spruance knew the United States had won a great victory, but was still unsure of what Japanese forces remained and was determined to safeguard both Midway and his carriers. To aid his aviators, who had launched at extreme range, he had continued to close with Nagumo during the day, and persisted as night fell. This late afternoon strike narrowly missed detecting Yamamoto's main body and failed to score hits on a straggling Japanese destroyer. The strike planes returned to the carriers after nightfall, prompting Spruance to order Enterprise and Hornet to turn on the carrier's lights in order to aid their landings.[95][nb 6] Finally, fearing a possible night encounter with Japanese surface forces,[96] Spruance changed course and withdrew to the east, turning back west towards the enemy at midnight.[97] For his part, Yamamoto initially decided to continue the engagement and sent his remaining surface forces searching eastward for the American carriers. Simultaneously, a cruiser raiding force was detached to bombard the island. The Japanese surface forces failed to make contact with the Americans due to Spruance's decision to briefly withdraw eastward, and Yamamoto ordered a general retirement to the west.[98] [nb 7]
At 02:15 on the night of 5/6 June, Commander John Murphy's Tambor, lying some 90 nmi (100 mi; 170 km) west of Midway, made the second of the Submarine Force's two major contributions to the battle's outcome. Sighting several ships, neither Murphy or his exec, Ray Spruance, Jr. could identify them and, fearing they might be friendly, Murphy held fire. He did, however, report the ships to Admiral Robert English, Commander, Submarine Force, Pacific Fleet (COMSUBPAC) but omitted to confirm their course. This report was passed on by English to Nimitz who then sent it to his senior Spruance. Unaware of the exact location of Yamamoto's "Main Body" (a persistent problem since PBYs had first sighted the Japanese), Spruance presumed this sighting was the invasion force and moved to block it while staying some 100 nmi (120 mi; 190 km) northeast of Midway.[100]
The ships sighted by Tambor were the group of four cruisers and two destroyers Yamamoto had sent to bombard Midway. At 02:55 these ships received Yamamoto's order to retire and changed course to comply.[100] At about the same time as the course change Tambor was sighted and, during the maneuvers designed to avoid the potential submarine attack, Mogami and Mikuma collided, inflicting serious damage to Mogami's bow: although less severely damaged Mikuma slowed to 12 knots to keep pace with Mogami.[101] This was the most damage any of the 18[102] submarines deployed for the battle achieved. Only at 04:12 did the sky brighten enough for Murphy to be certain the ships were Japanese, by which time staying surfaced was a hazard, and he dived to approach for an attack. This was unsuccessful, and at around 06:00, he finally reported two westbound Mogami-class cruisers.[103]
Over the following two days, first Midway and then Spruance's carriers launched several successive strikes against the stragglers. Mikuma was eventually sunk by Dauntlesses,[104] while Mogami survived further severe damage to return home for repairs. The destroyers Arashio and Asashio were also bombed and strafed during the last of these attacks.[105] Captain Richard E. Fleming, a U.S. Marine Corps aviator, was posthumously awarded the Medal of Honor for his attack on Mikuma.[106]
Meanwhile, salvage efforts on Yorktown were encouraging and she was taken in tow by USS Vireo, until late afternoon on 6 June when Yorktown was struck by two torpedoes from I-168. There were few casualties aboard Yorktown, since most of the crew had already been evacuated, but a third torpedo from this salvo also struck and sank the destroyer USS Hammann, which had been providing auxiliary power to Yorktown. Hammann broke in two with the loss of 80 lives, most due to her own depth charges exploding. Yorktown lingered until just after 05:00 on 7 June.[107]
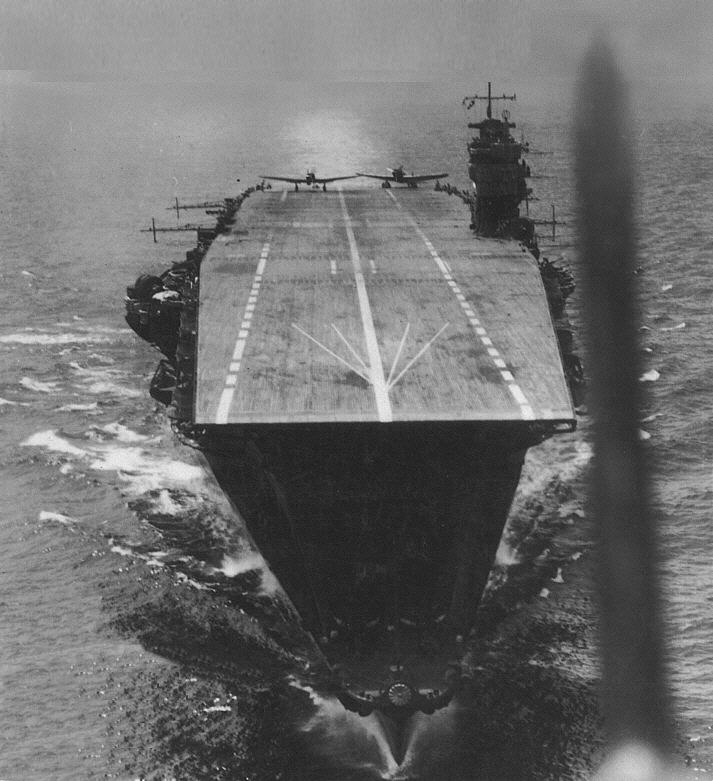
The Japanese aircraft carrier Akagi (Red Castle).
[edit] American reinforcements
To do battle with an enemy force anticipated to muster four or five carriers, Admiral Chester W. Nimitz, Commander in Chief, Pacific Ocean Areas, needed every available U.S. flight deck. He already had Vice Admiral William Halsey's two-carrier (Enterprise and Hornet) task force at hand, though Halsey was stricken with psoriasis and had to be replaced by Rear Admiral Raymond A. Spruance, Halsey's escort commander.[28] Nimitz also hurriedly recalled Rear Admiral Frank Jack Fletcher's task force, including the carrier Yorktown (which had suffered considerable damage at Coral Sea), from the South West Pacific Area. It reached Pearl Harbor just in time to provision and sail.
Despite estimates that Yorktown would require several months of repairs at Puget Sound Naval Shipyard, her elevators were intact, and her flight deck largely so.[29] The Pearl Harbor Naval Shipyard worked around the clock and in 72 hours, she was restored to a battle-ready state,[30] judged good enough for two or three weeks of operations, as Nimitz required.[31] Her flight deck was patched, whole sections of internal frames cut out and replaced, and several new squadrons were drawn from Saratoga; they did not, however, get time to train.[32] Nimitz disregarded established procedure in getting his third and last available carrier ready for battle. Just three days after putting into dry dock at Pearl Harbor, Yorktown was again under way. Repairs continued even as she sortied, with work crews from the repair ship USS Vestal, herself damaged in the attack on Pearl Harbor six months earlier, still aboard.[33]
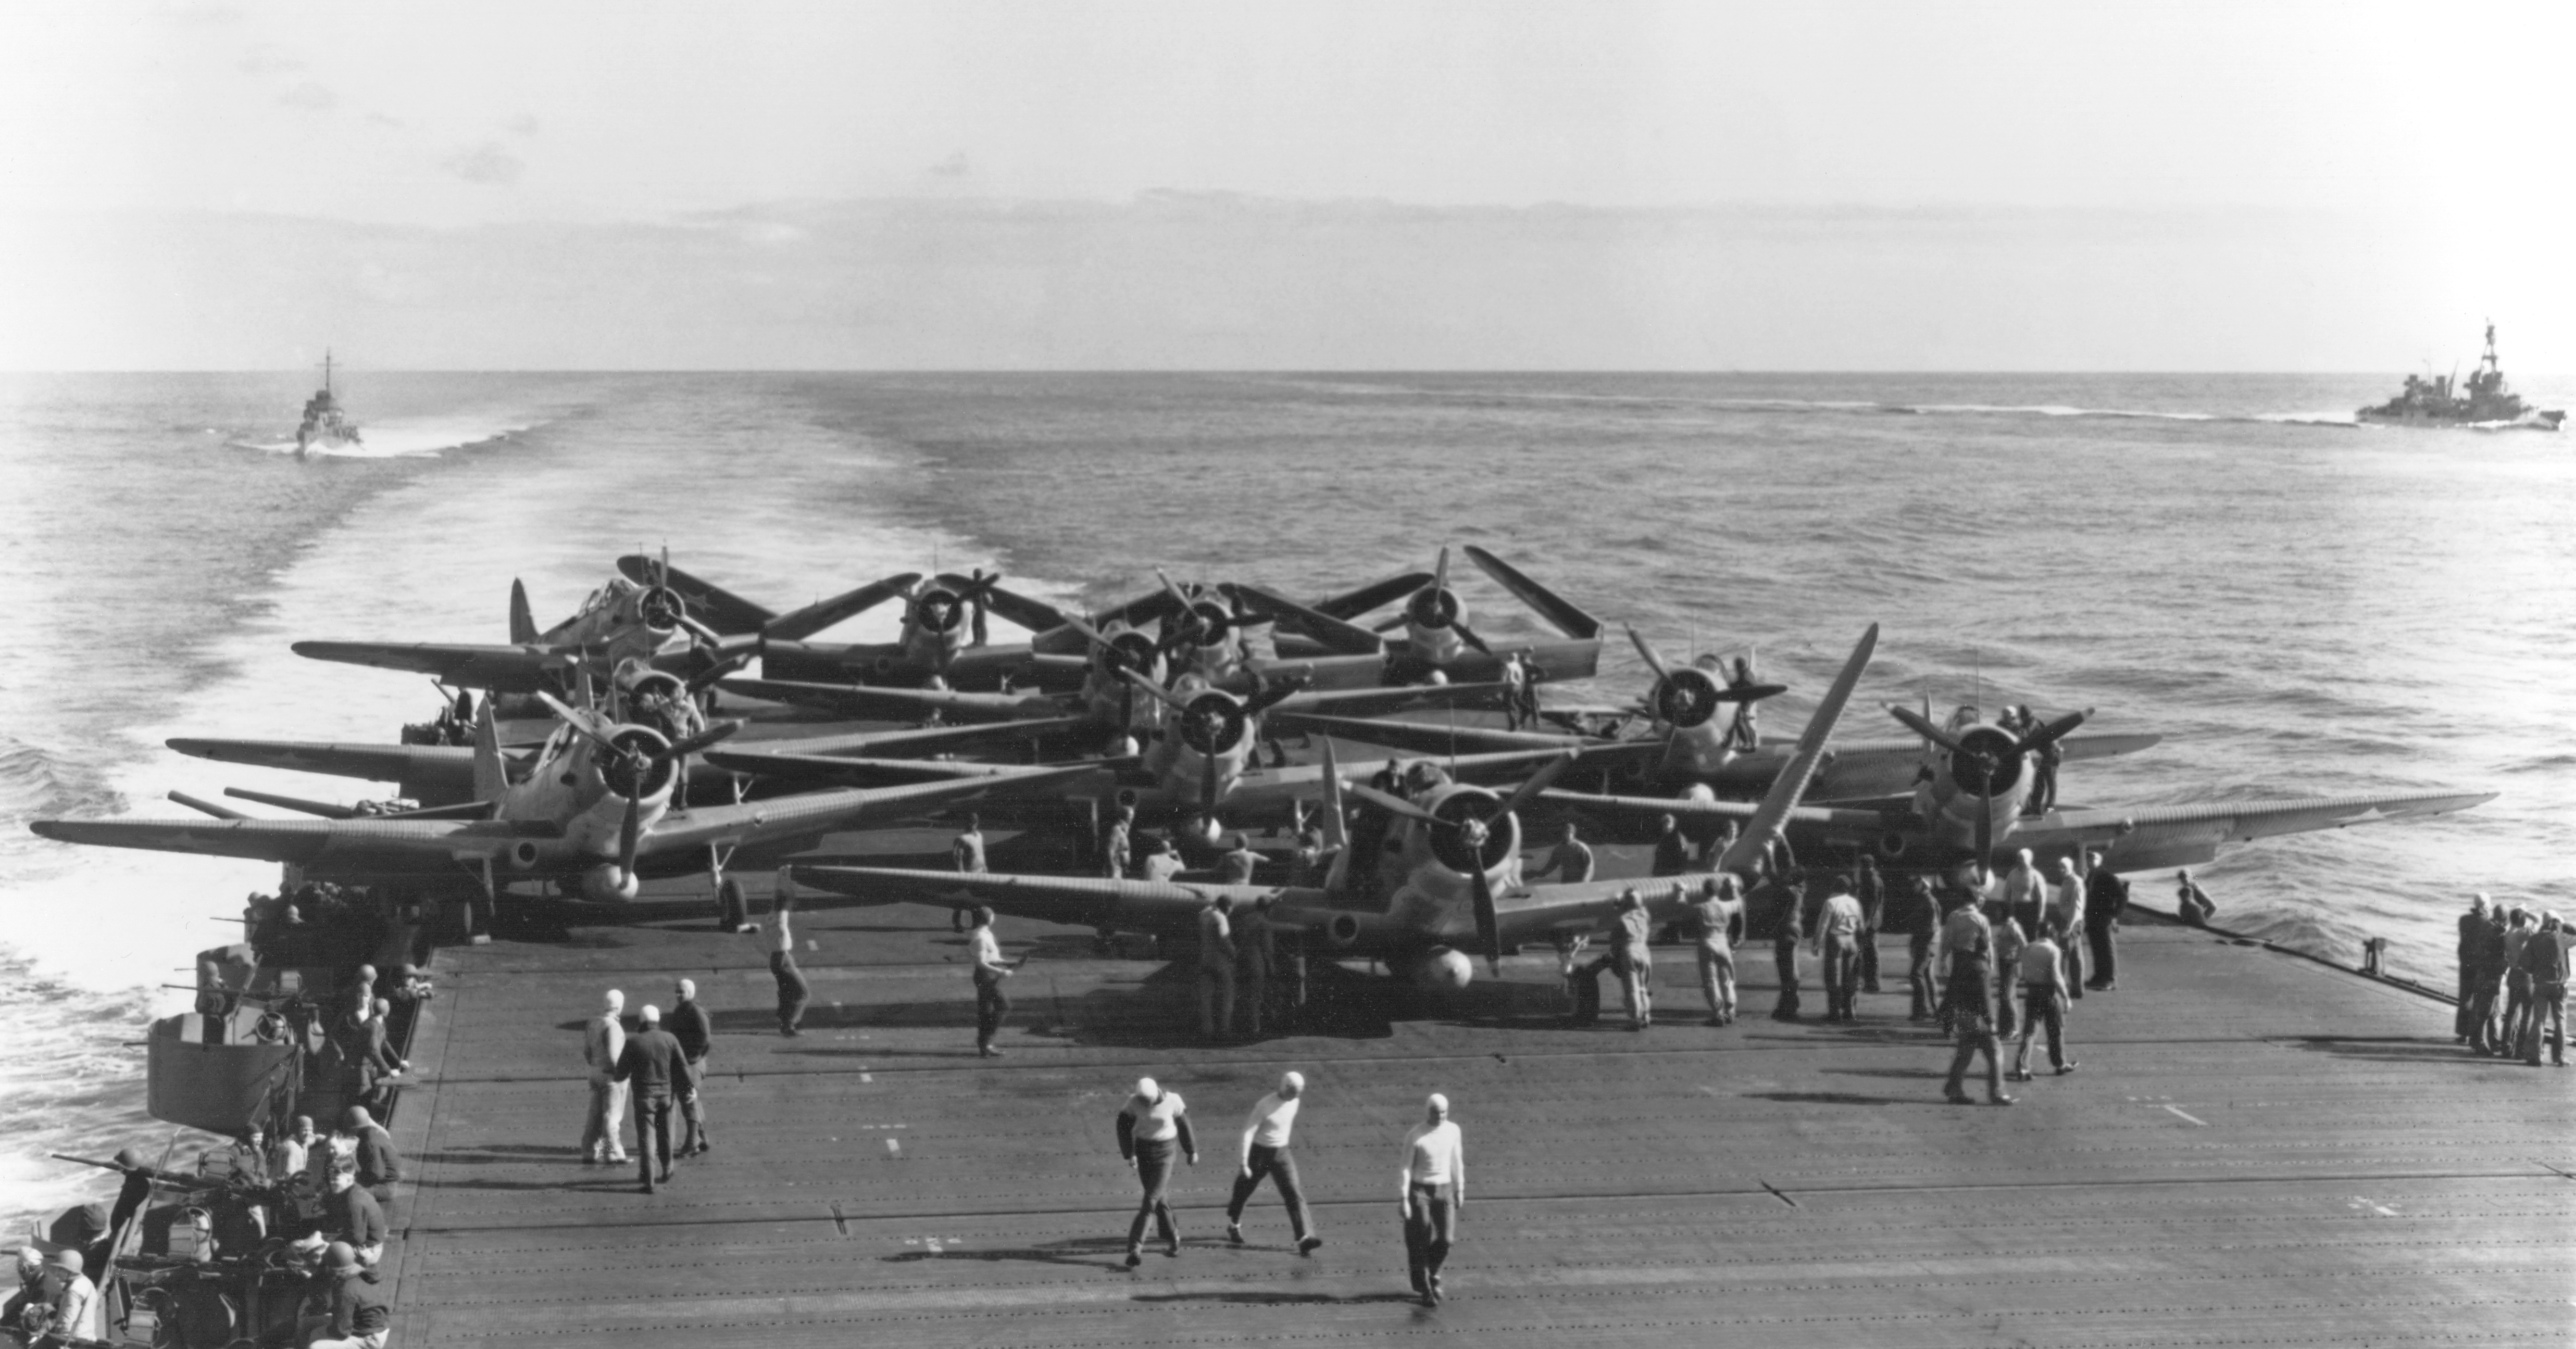
On Midway by 4 June the USN had stationed four squadrons of PBY Catalinas — 31 aircraft in total — for long-range reconnaissance duties, and six brand-new Grumman TBF-1 Avengers: the latter were a detachment from Hornet's VT-8.[34] The Marine Corps had 19 SBD Dauntlesses, seven F4F-3 Wildcats, 17 Vought SB2U-3 Vindicators, and 21 Brewster F2A-3s. The USAAF contributed a squadron of 17 B-17 Flying Fortresses, along with 8 B-26 Marauders equipped with torpedoes: in total 124 aircraft.[35]
Japanese shortcomings,
Meanwhile, as a result of her participation in the Battle of the Coral Sea, the Japanese carrier Zuikaku was in port in Kure, awaiting a replacement air group. That there were none immediately available was a failure of the IJN crew training program, which already showed signs of being unable to replace losses.[36] Instructors from the Yokosuka Air Corps were employed in an effort to make up the shortfall.[36] The heavily damaged Shōkaku had suffered three bomb hits at Coral Sea, and required months of repair in drydock. Despite the likely availability of sufficient aircraft between the two ships to re-equip Zuikaku with a composite air group, the Japanese made no serious attempt to get her into the forthcoming battle.[37] Consequently, Admiral Nagumo would only have four fleet carriers: Kaga and Akagi forming Carrier Division 1; Hiryū and Sōryū as Carrier Division 2. At least part of this was a product of fatigue; Japanese carriers had been constantly on operations since 7 December 1941, including raids on Darwin and Colombo.The main Japanese strike aircraft to be used were the Aichi D3A dive bomber and the Nakajima B5N2, which was capable of being used either as a torpedo bomber or as a level attack bomber. The main carrier fighter was the fast and highly maneuverable Mitsubishi A6M2 "Zero".[nb 3] However, the carriers of the Kido Butai were suffering from a shortage of frontline aircraft. For various reasons, production of the D3A had been drastically reduced, while that of the B5N had been stopped completely.[38] As a consequence, there were none available to replace losses. This also meant that many of the aircraft being used during the June 1942 operations had been operational since late November 1941; although well maintained, they were almost worn out and had become increasingly unreliable. These factors meant that all carriers had fewer than their normal aircraft complement and few spare aircraft.[39]
Japanese strategic scouting arrangements prior to the battle were also in disarray. A picket line of Japanese submarines was late getting into position (partly because of Yamamoto's haste), which let the American carriers reach their assembly point northeast of Midway (known as "Point Luck") without being detected.[40] A second attempt at reconnaissance, using four-engine Kawanishi H8K flying boats to scout Pearl Harbor prior to the battle (and thereby detect the absence or presence of the American carriers), part of Operation K, was also thwarted when Japanese submarines assigned to refuel the search aircraft discovered that the intended refueling point — a hitherto deserted bay off French Frigate Shoals — was occupied by American warships (because the Japanese had carried out an identical mission in March).[41] Thus, Japan was deprived of any knowledge concerning the movements of the American carriers immediately before the battle.
Japanese radio intercepts did notice an increase in both American submarine activity and message traffic. This information was in Yamamoto's hands prior to the battle. However, Japanese plans were not changed; Yamamoto, at sea on Yamato, did not dare inform Nagumo for fear of exposing his position and assumed that Nagumo had received the same signal from Tokyo.[42] Nagumo's radio antennae, however, were unable to receive such long-wave transmissions, and he was left unaware of any American ship movements
Subscribe to:
Posts (Atom)